1. Introduction
DJI remote controllers run a locked-down Android. Flight logs are written to the controller's internal storage. Here's where Syncthing comes into play.
Syncthing is a free, open-source, peer-to-peer file synchronisation tool. It runs on both Android and desktop and keeps a folder on two or more devices in sync. Install it on the RC and on your PC, pair the two devices, point Syncthing at the DJIFlightRecords folder, and every flight you finish will appear on your computer.
This guide walks through the full setup end to end. It assumes a DJI RC running Android (RC 2 / RC Pro / RC Plus) and a Windows, macOS, or Linux computer.
2. Install Syncthing on the DJI RC
The DJI RC does not have Google Play, so Syncthing has to be installed as an APK. Use the community fork Syncthing-Fork — the original Android app is no longer maintained, and the fork is the de-facto replacement.
-
On a computer, download the latest release APK from the
Syncthing-Fork GitHub releases page:
github.com/Catfriend1/syncthing-android/releases.
Pick the
app-release.apkasset (universal build). - Copy the APK onto the DJI RC with a USB-C cable connected to your PC, then use the controller's built-in file manager to copy the APK to internal storage.
- On the RC, open the file manager, navigate to the APK, and tap it. Android will prompt to allow installation from unknown sources — approve it for the file manager. Confirm the install.
- Open Syncthing-Fork. On first launch it will ask for storage permissions — grant all files access. Without this the app cannot read the DJI Fly log folder.
- In the app's settings, disable battery optimisation for Syncthing and enable "Run in background" and "Start service on boot". This keeps the sync daemon alive while you are flying.
3. Install Syncthing on your computer
Pick the instructions for your operating system:
- Windows: download SyncTrayzor or the official binary from syncthing.net/downloads and run the installer.
-
macOS: install via Homebrew with
brew install --cask syncthing, or download the.dmgfrom the Syncthing site. -
Linux: most distributions have it in their package manager
(
sudo apt install syncthingon Debian/Ubuntu,sudo pacman -S syncthingon Arch, etc.).
Once installed, launch Syncthing. It will open its web UI at
http://localhost:8384 in your browser. Leave this tab open — it is
the control panel for the whole setup.
4. Pair the two devices
Syncthing identifies every installation with a unique Device ID —
a long string of letters and numbers, divided into seven groups
(for example ABCDEFG-HIJKLMN-OPQRSTU-VWXYZ12-3456789-ABCDEFG-HIJKLMN-OPQRSTU).
Every device has its own ID and it never changes. Pairing means exchanging these
IDs so the two clients know which peers to trust.
Find the PC's Device ID
You only need the PC's Device ID. The RC will use it to initiate the pairing, and the PC will then accept the incoming request with a single click.
On the PC, open your browser and visit
http://localhost:8384. The Syncthing web GUI loads. In the
top-right corner click the Actions dropdown → Show ID. A
dialog appears containing the PC's Device ID as a long string. Copy it.
Add the PC's ID to the RC
- On the DJI RC, open Syncthing-Fork → Devices tab → tap the + (add device) button.
- You will see a Device ID field at the top. Email the PC's Device ID to yourself, open the email on the RC, copy the string, and paste it into the Device ID field.
- Give the device a readable name, e.g. "PC".
- Leave the other options at default and tap Save.
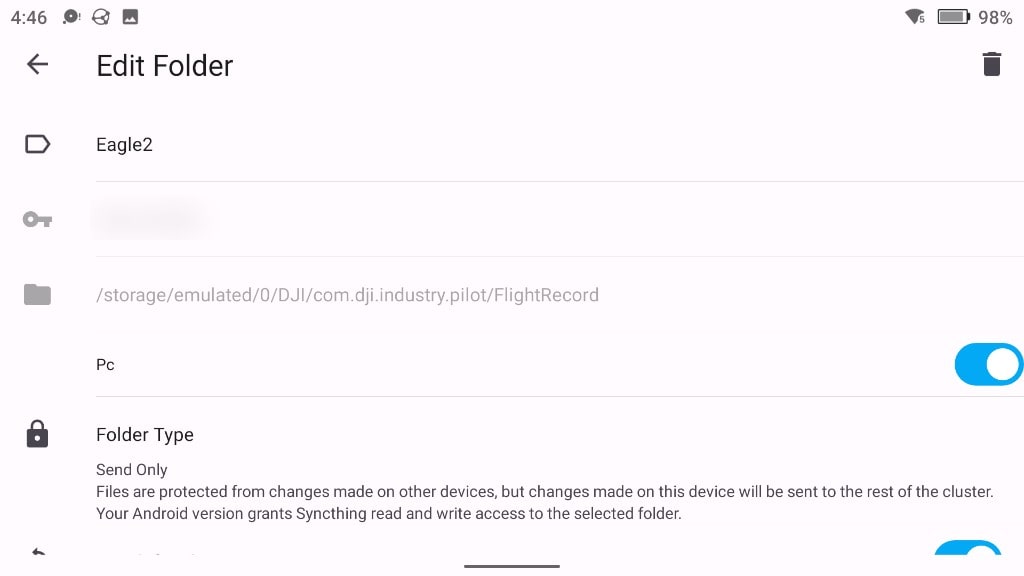
5. Share the DJI Flight Record folder
Add the folder in Syncthing-Fork on the RC
- Switch to the Folders tab and tap the + (add folder) button.
- Folder label: the human-readable name shown on both the RC and the PC Syncthing dashboards. If you fly more than one aircraft, use the drone's name (or a nickname) rather than the generic "DJI Flight Logs".
-
Directory: tap the folder icon and navigate to the
FlightRecorddirectory for your controller. - Folder type: set this to "Send only". The RC writes logs; the PC only receives. Send-only prevents any accidental change on the PC from propagating back to the controller.
- Scroll down to the device list on the same screen — your PC should be there as "PC" (or whatever name you gave it in step 4). Toggle it on. Without this the folder stays local to the RC and the PC will never see it.
- Tap Save. The RC will scan the folder and offer both the device connection and the folder share to the PC.
Accept the connection and folder share on the PC
Now switch back to the PC. Open the Syncthing web GUI at
http://localhost:8384 and leave it open for 10–30 seconds.
- A blue banner appears at the top: "Device <RC-ID-prefix> wants to connect". Click Add Device, name it "DJI RC" (or similar), and save. The RC and the PC should flip to Connected — green on both UIs — within a few seconds.
- A second banner follows: "DJI RC wants to share folder 'Eagle2' (<folder-id>) with you". Click Add.
- In the dialog, set the destination Folder Path on your computer.
- Under Folder Type, pick "Receive only" to mirror the send-only side on the RC.
- Save. Syncthing indexes both sides and begins copying. The first sync takes as long as your log history warrants; subsequent flights appear within seconds of landing and powering down the aircraft.
If no banner appears on the PC after a minute, make sure Syncthing-Fork on the RC is not paused, then refresh the PC web GUI.
Repeat this section for each drone: add a new folder on the RC with a drone-specific label, toggle the PC on in its device list, save, then accept both the connection (first time only) and the folder share on the PC into their own subfolders. Each drone ends up in its own clean destination.
6. Verify it is working
- Power on the aircraft, fly a short hover, land, and power down normally so DJI Fly finalises the log.
- On the RC, open Syncthing-Fork — the folder should briefly show "Scanning" then "Up to date".
- On the PC, open the destination folder. A new
.txtfile with the flight's timestamp should be there. - Drop it into the flight log viewer to confirm it parses cleanly.
Once this is set up you never touch a cable again. Land, power down, and by the time you have packed the aircraft the logs are on your computer ready to open in the flight log viewer.
Questions or a setup that misbehaves? Email hello@djiflightdata.com.